Gift for February 23 origami made of paper. Master class on crafts for preschoolers
photo: gamejulia
Origami for February 23
At the end of the last winter month, it is customary to congratulate men on their holiday - Defender of the Fatherland Day. And we’re not just talking about dads, grandfathers, brothers, sons and husbands who served in the army or participated in combat. By tradition, we call “defenders” all men who guard the peace of not only the country, but also their loved ones.
Children and grandchildren can congratulate their loved ones on the holiday by making crafts using the origami technique for February 23rd with their own hands. For this type of needlework you will need colored paper or sheets of soft cardboard. Using paper origami for February 23, you can create original models of an airplane, tank or other military equipment, a star, an order or a shirt and tie.
Origami for February 23rd for dad
If dad is related to the army, then you can make a craft using the origami technique with an emphasis on the branch of his troops. You can give a sailor a boat, a pilot a paper airplane, a tanker a tank. A pleasant surprise will be a paper model of shoulder straps with the number of stars corresponding to the rank of the pope.
Modular origami for February 23
An origami gift for February 23, made from numerous paper modules, will be especially impressive. This technique allows you to obtain voluminous and surprisingly realistic figures. Of course, such work will require a lot of effort and patience, but the result is worth it - dad will certainly like the gift and will take pride of place among other crafts.
Hello dear masters and craftswomen. I present to your attention a master class on making such an origami swan, and I called it “Swan in Pink”. How to make an origami swan? We will make a pink drawing, highlight the swan with pink modules around the perimeter and place it on a round stand, and also glue small eyes. Please watch this video on making an origami swan. IN […]
Hello dear masters and craftswomen! Today I bring to your attention a master class on making a tricolor Swan from triangular modules. It would seem that what else can you come up with, what other options are there for making Swans using the modular origami technique. But it turns out there are still options and this is not the last thing in my arsenal. The tricolor swan is so simple […]
Hello dear masters and craftswomen! I bring to your attention a new master class on making a Swan in black from 3D modules. In the last lesson we made a Swan in red, but now I decided to change the style a little and make a Swan in black. The scheme is not complicated and will suit anyone, even a beginner in modular origami. Specially […]
Hello dear masters and craftswomen! I bring to your attention a new master class on making a Swan in red shades. On the Internet you can find a huge number of different schemes and master classes on making Swans using the modular origami technique. I'm sure you've never seen a swan like this before. This scheme is quite simple and even [...]
Swan in blue. Video tutorials and diagram. Part 3. In the third part of the master class, I offer you two video lessons and a detailed origami diagram of how to make a swan. The first video shows how to make a swan's neck and how to make a small stand. The second video talks about how to glue a swan better and faster. Lesson 6 (neck and […]
Swan in blue. Video tutorials and diagram. Part 2. In the second part of the “Swans in Blue” tutorial we finish making the body. I have prepared for you two video tutorials and a detailed diagram of an origami swan from modules. To assemble a swan you will need 1438 modules of 1/16 size, of which: 317 - purple modules 471 - blue modules 552 - blue […]
Swan in blue. Video tutorials and diagram. Part 1. I bring to your attention a new master class on making an origami swan from paper from 3D origami modules. The design is quite unusual and the appearance of the wing is not quite classic. In the photo you can see small through holes and a mesh pattern. I'll be honest - the scheme is quite complicated! Especially for this scheme I […]
“Rainbow Swan” diagram and video tutorials (part 3). The third part of the “Rainbow Swan” master class consists of three video tutorials on assembling the stand. And I also decided that a video tutorial on gluing the “Rainbow Swan” would be very useful for you. Lesson 5 (stand part 1) Lesson 6 (stand part 2) Lesson 7 (stand part 3) […]
On February 23, you really want to please your beloved men with little surprises and pleasant gifts, and not only because how you celebrate February 23 is how you spend March 8.
It doesn’t matter what holiday you are preparing for - February 23, a regular birthday or anniversary, the question always arises: what to write a congratulation on? The choice of printing products is now huge. But today we will tell you how to make an original postcard in the form of a shirt and tie with your own hands. A postcard with a shirt and tie is not only an original gift for Defender of the Fatherland Day, but also for Father’s Day.

You will need:
1. Colored cardboard or A4 paper.
2. Scissors.
How to fold the base
If this is your first time doing something like this, it's better to use a template. The shirt card is made from the usual rectangular format, although the folding options still differ. The following photo shows the sequence of steps you need to follow to get a shirt with a collar and sleeves.
Below you can watch a video master class on making a postcard-shirt with a tie. 
How to make a tie
This is done from a square blank in the sequence shown in the following photos.
A few more folds and the tie will be ready.

Instead of an origami tie, you can use a paper ribbon and tie it with a tie knot, cutting its ends diagonally: 
Video master class
Hi all! On the agenda today are crafts that everyone will soon have to do with their children, because February 23 is a holiday that is celebrated in every family. Of course, our beloved men should be fed a very tasty gala dinner, made with hot dishes and, of course, salads. But what about gifts, you can’t live without them, so take ideas and implement them.
Even if it is a very small and modest souvenir, it will be made with your own hands, which will definitely conquer your dad or grandfather. Therefore, sit back and look, choose, and then get to work).
I remember when I was in school, we made keychains from artificial leather during labor lessons, now you can make them from felt or foamiran.
There is nothing easier than taking a sheet of paper and making funny and amusing little people out of it. This is me and such a famous technique as origami, such a creative work is suitable for the senior or preparatory group of the garden, look at this diagram and repeat all the steps. The result is something that looks like a rocket, and your dad is sitting in it))).

You can also cut out a rocket out of cardboard with your children, and then glue the windows, you will get a simple application that children of the middle or younger group can handle.

All men love tea and coffee, so why don't we take advantage of it.

But, as a teacher, you will have to make blanks from thick cardboard. Moreover, one part of the mug should be slightly smaller.

Fold in half using the accordion method.

Glue a tea bag tag onto a string.

And then decorate it by gluing stripes that symbolize our flag.

It turned out easy and beautiful.
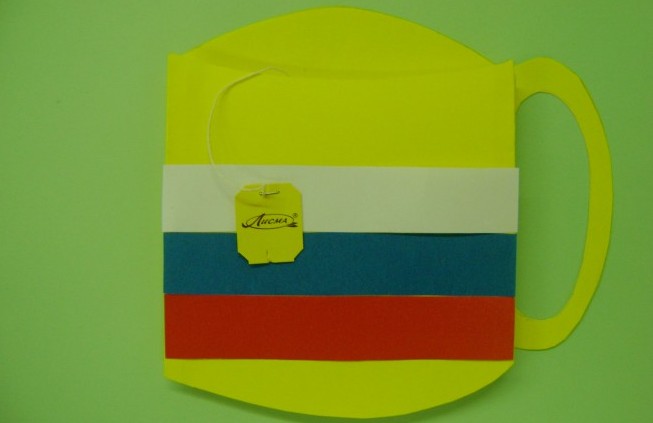
And most importantly, the children liked it and gave them great pleasure.

An interesting option would be a craft in the form of a train.


We make gifts for dads with schoolchildren
Of course, there will be congratulations and wishes on this day, so I suggest elementary school students make a postcard out of paper, using interesting material. For example, you can tastefully decorate a disposable paper plate.

Or create a real masterpiece postcard from very unusual materials in the plasticine style.

We will need:
- white paper A4 - 1 pc.
- printed text in the form of poems
- pencil, ruler, plasticine
- cocktail straws
- fireworks or sparkles
- PVA glue

Stages of work:
1. Fold a sheet of white paper in half. Draw a vertical line like this.

2. Then cut along its contour with special decorative scissors.


4. Lay out a flag from plasticine and decorate the numbers.

5. Then cut the tubes of different colors finely and stick them into the plasticine. Glue the fireworks, and then let the glue dry. This is such a wonderful postcard, one might say it turned out to be a souvenir, all that remains is to include congratulatory wishes.

You can also, if you didn’t like the previous option, use the art of quilling for high school students.

Crafts made from CDs, the most ordinary CDs with holiday symbols, look very bright and impressive.

Impressive, simple and looks quite creative.

You can resort to this method, it is more suitable for children aged 5-10 years, you will need glue, paper and scissors. This is the well-known shirt and tie.


You can complicate the task a little and make an origami style tie.

A popular school children's craft can be a boat made of cardboard and paper.

An original gift would be a photo frame, and you need to cut out a frame from an ordinary hard box, and then use woolen threads to decorate it and decorate it with stars. You can use stickers, rhinestones and scrapbooking materials.

You can make a medal for your grandfathers from plasticine balls.

Master class of a paper soldier for the little ones
The simplest and easiest craft is considered to be made from plasticine. You can find a lot of variations, because the symbols of the upcoming men's holiday will be all kinds of cars and road transport.
In the first place, as always, is the tank, the majority do it, I don’t know why, but it happened this way by tradition, probably this is one of the symbols of victory.

You can make it exclusively from modeling dough or plasticine, as well as using matchboxes.

There is another option, use all sorts of things like nuts, dowels and other working delights.

Second place goes to airplanes.

If you have never made them, then here are step-by-step instructions for you.

Or build a helicopter, just make sure you don’t fly away).

For older children, you can make a gang of soldiers.

Do you want to know the features of their manufacture? Then look further at all the step-by-step steps and repeat all the steps of folding and folding the paper.
This is the set you will need for work:

Now, as for actions, move from right to left, and then everything will work out for you.


In general, then you can make a wall newspaper and decorate your group or class. Looks fun and funny, doesn't it?

Learn how to make gifts for dad on Defenders of the Fatherland Day
The first option that students use is the cutting method, when squares are cut out of corrugated paper, then wound onto a stick or pencil and glued to a sheet.


Or a real picture, but of course you’ll have to tinker with it a little longer.

For younger children, the ball rolling technique works well.

Well, the most difficult option is a photo frame, made with your own hands from a special material, like ball plasticine.

If your children are still very young, then you can invite them to make such a boat from a dish sponge and a stick; this is just for kids).

In addition to everything, you can learn a poem.

Master class on crafts for preschoolers

We will need:
- ice cream sticks - 8 pcs.
- juice tube - 1 pc.
- PVA glue
- gouache and brush
- scissors
Stages of work:
1. Make a base, so to speak, a rod on which the wings will rest. Take 5 sticks and glue them together with PVA glue.

2. Then glue one stick perpendicularly, but step back a little from the edge, as shown in this picture.

3. After this, glue the pieces of tubes on the sides.

4. It should look something like this: If you do too, move on to the next step.

5. At this stage, you need to glue the second one parallel to the first stick, you will get a wing.

6. Make the tail of the plane from another stick, just halve it.

7. The most awaited moment is the design, take brushes and gouache and paint the body.

8. And here he is, such a funny and super airplane. By the way, you also need a propeller, don’t forget to glue it along with a button or bead.

Or you can do almost the same thing from clothespins.

I also really liked the option of a regular plastic bottle and straws.

If you also liked this work, take note of it, here are the steps to complete it.

We make toys from various available materials
In most cases, men like all kinds of equipment, including military equipment, so you can make the following from paper napkins and matchboxes: a tank:

Or an ordinary car.

Using dishwashing sponges, create a small tank.

Or create a delicious gift using a mountain of candy you can ask your mom for.

Or you can make an applique.

In general, surprise your loved ones with something, I gave you ideas to think about, so think and recreate. Good luck.

If among your friends there are people who are fond of hunting, for example, a grandfather, then you can give him such a junk souvenir in the form of deer antlers from a plastic bottle and caps.

You can use your Lego constructor and make a stand for pencils, pens, and writing instruments.

You can build a racer from a toilet paper roll; take a man from a construction set.

Of course, they also make toys from papier mache, but it’s a little complicated.

Or this little masterpiece made from cotton pads - a postcard.

And that's all I have. I wish you that everything you have planned will succeed, patience and perseverance, as well as inspiration and creative ideas. Bye everyone, see you!
Sincerely, Ekaterina Mantsurova
DIY gift for dad on February 23 — step-by-step photo master class on making an origami tank with explanations. Both a child and an adult can “make” such a wonderful fighting machine out of paper. This craft can be folded from a small sheet of paper and the small tank can be used as a decoration for wrapping a gift for your husband and Dad. Also, a large origami tank may well become an additional pleasant surprise to mom’s gift for dad. In any case, the protector of your family will be delighted with such an interesting children's craft dedicated to February 23rd.
DIY paper crafts for February 23rd - this is a wonderful way to pamper your dad or grandfather with well-deserved attention and a gift that keeps the warmth of your hands and the hands of your children.
According to established tradition, on February 23 we celebrate Defender of the Fatherland Day, the former Birthday of the Red Army and Navy. On this day, we honor the valor and courage of those who are ready at any moment to defend the country of their home. According to tradition, girls, girls, women, as well as still young future defenders of the fatherland, prepare and present gifts to the heroes of the occasion.
Another tradition that we inherited from Soviet times is making DIY gift for dad on February 23rd . Nowadays, a good memorable gift for your father, brother, husband or grandfather can be easily found and bought in a store. However, it is customary to accompany such gifts with something made with your own hands - beautiful, original and from the heart.
What gift should I give my dad on February 23rd?
This paper craft is captivating because even preschoolers can make it with great pleasure. But only under the strict control and with prompts from an adult. But how much delight and joy there will be when your child can make an origami tank with his own hands! This will be a real reason to be proud.
Therefore, an origami tank can be called a craft suitable for classes in kindergarten in the junior, middle, senior or preparatory groups.
Gift for dad on February 23rd in kindergarten. Gifts for dads on February 23 in kindergarten. Gift for dad on February 23rd photo.
Also, a master class on creating an origami tank can be used to make crafts for school on February 23rd.
Adults will also definitely enjoy this process and the result - a beautiful combat vehicle that can be used to decorate a package with a holiday souvenir for your protector, friend or father.
Required materials: A4 sheet of green paper (tank body), as well as a sheet of paper for notes
How to make an origami tank:


A sheet of A4 paper needs to be folded in half horizontally.


Mark the fold lines as shown in the photo

Carefully fold the paper along the fold lines, smoothing it on one side to create neat and clear fold lines.


Paper crafts for February 23: making an origami tank

We continue to work with the same part, which will be the tracks of the origami tank. It needs to be bent towards you.
We perform the same sequence of actions on the other side of the sheet.


The tank body blank needs to be smoothed out again and the corners of one of the triangles bent up. The craft needs to be turned over and divided into approximately three parts.


We turn the craft down again and bend the square folded from the triangle

We insert the square into the triangle that remains below

We straighten the ends of the triangle blank so that the square remains under it.


We tuck the ends of the triangle into the pockets of the square

We straighten the tracks, now the only thing left to do is fold the gun barrel from a piece of paper.


We insert the barrel into the hole in the tower.
Gifts for February 23rd for dad from his daughter. Gift for dad on February 23 middle group. Gift for dad on February 23, senior group. Gift for dad on February 23, preparatory group. Gift for dad on February 23, junior group.